Showing posts with label Food. Show all posts

16 January 2011

Avacados in Season


Avacados were on sale last week for 25 cents each
so I loaded up and made a double batch of one of my favorite treats.
Here's the (single) recipe:

Guacamole

3-5 avacados, mashed
1 tomato, chopped
2 cloves garlic, minced
1/2 onion, finely chopped
juice of 1/2 fresh lime
salt to taste

Serve with your favorite whole-grain corn chips.

Enjoy!

12 January 2011

When Life Gives You Snow---


The Treasure is always thrilled to see all that white stuff piled up out there.
(Unlike her aging, aching-jointed parents...) 
But her begging persuaded me,
as after all, I like sweet treats, too!

So, here's my new winter slogan:

When Life Gives You Snow---


---Make Snow Ice Cream!!!

*1 large bowl filled with snow (make sure it's, uh, ahem--clean!)
*Enough Silk Soy Milk to make the mass creamy
*Vanilla to suit your taste
*Stevia powder, or powdered sugar, or both--
enough to make your sweet tooth sing!

Mix all together well.
If you get too much liquid and it is soupy,
you can always go get more snow to thicken it up.
Or put it in the freezer for a little while.

Scoop it into bowls
and dig in.
We enjoyed eating ours with our backsides roasting beside the fire.
:D

Enjoy what life brings!

"The rich man gets his ice in the summer
and the poor man gets his in the winter."
--from The First Four Years by Laura Ingalls Wilder

22 December 2010

Happy Hen House

The current poultry compound.

It occurred to me recently that it has been quite a while
since I posted about our little friends in the backyard.

Some of the following photos will be familiar
to long-time readers, as they are being imported over here
from our private blog.
To the rest of you they will be new material.

A little over a year ago we began constructing the current hen house,
and for some time now it has been finished and in use.
I just forgot to update you about it!

To keep this as brief as possible,
I'll mostly recap the building process with photo captions:

This is an old pop-up camper the Man salvaged only because he wanted
the trailer frame. Hurricane force straight-line winds did this damage
one fine summer day, insuring that the trailer was indeed trashed!

When I see the Man in this stance, I know his wheels are turning and the
creative process is starting!

And then, when he begins digging through what I affectionately call
"The Poor White Trash Pile,".....I can be certain that something is up.

Here he is, cheerfully de-constructing the camper.
Demolition is always the fun part!!

Down to the frame, and floor, almost ready to start building.....
as soon as that back bumper comes off!

And here is the beginnings of the new hen house.
We pirated a general design from a commercial structure we'd seen,
but a lot of the measurements and such we had to figure out as we went.
Like I said.....creative process.

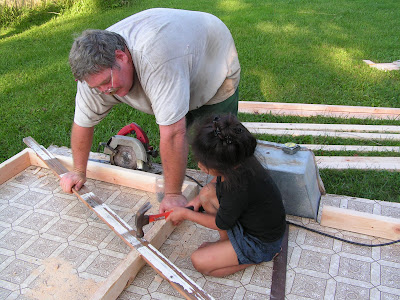
A family project.....the Treasure learns some new skills.

The frame taking shape.

Roof and sides are on, time to fill in the ends.
Where will the door fit?

And here it is, all cozy and complete.
The "tractor" to the right is the portable summer apartment,
we move the hens around to whatever greens need decimating--
usually garden weeds!
The pen on the far left is a dog kennel that a family member
needed to find a new home for, and we put wire mesh over the top
to discourage the chicken hawks.

It is hard to get good photos because it is so small,
but here is a shot of the inside.
Water is in an insulated jug (keeps it from freezing in winter)
and their feed is in the galvanized trash can on the left.


The roosting poles go across the back of the building.
We intend to build 3-4 nest boxes where the lighter boards
are under the window, but at present this is not a priority
as we only have 3 hens and they are on strike right now.
(I keep repeating the rhyme my dad told me to say to them:
"An egg a day--keeps the hatchet away!"
They pay me no mind. Guess they know
they are pets and are in no danger of being eaten!)


And on the right side of the door you see the hanging feeder,
a water dish, and the current--but very neglected--nest box.

So there you have it, our portable little hen house.
Small, simple and functional.
We do plan to take it with us when we make our final move,
but I think we will place it on a larger trailer to transport it,
rather than try to run it down the road on its little wheels!

The hens love it.
It is so funny to see them lined up at the gate of the big pen
every dusk these past winter afternoons.....the Man has them trained
to march right into the coop as soon as he opens the door.
Inside, they cluck and murmur and scratch in contentment.

A house that makes the hens happy.

26 October 2010

Abundant Provision


About a month ago, The-Man and I were delighted to see
the tiny seedlings you see in the photo above.
You see, this spot is the exact same place
where we planted our salad garden in April of this year.
Due to our decision to move
we didn't spend a lot of time in the garden over the summer
nor did we plant anything else in this space.

The lettuces went to seed and then died away...

 and now, about four months later,
this is our most welcome volunteer
autumn salad garden!
The greens are mild and tender...tasty and crisp!
I wish I could share them with you.


The red wire fence around the plot will soon support
some 6 mil plastic to fend off the frost for a few more weeks
(we hope)
It will be interesting to see how long we can harvest
before the temperatures kill the plants.

Do you see the plant on the left
in the above photo,
in front of the grass wickiup?
That is a tomato that has come up volunteer
from heirloom seed as well.
It has blossoms on it but I do not expect it to produce.
It would be interesting to see how long it would live
if it were in a hoop house with a little wood heater, wouldn't it?


We were given a few plants of these heirloom golden cherry tomatoes by a friend
about 15 years ago, and they have been coming up volunteer ever since!
They have adapted to our soil and growing conditions
and are the sweetest tomatoes I've ever eaten.
We do have some seed saved--
we want to get them established in our new garden come spring.


Aren't seeds an amazing gift from God?
When you stop to ponder it a bit...
Just one seed from a tomato will grow a plant ...
which will produce hundreds of tomatoes...
which each have 25 to 50 seeds inside them...
which will grow that many plants...
and I would need a calculator to calculate the numbers beyond that...
and God provides seeds free of charge!
He placed Adam in the midst of the garden...
in the midst of abundance!

One of the reasons we are moving to the country
is to do more gardening...to grow more of our own food...
food from unmodified seeds...foods that will nourish and heal our bodies...
and though we may have a small initial expense in acquiring some seed,
we are learning to save our own
so we can grow our own and have extra to share.

Have you seen this video?

If not, and you eat food, whether you grow your own
or buy from someone who grows it for you,
I strongly encourage you to take the time to view it--
it's free to watch online.

When you're done, then take time to watch this one:
I think you'll be glad you did!
~~~~~~~~~~~~~~~~~~~~
Growing some food in whatever small space you have available
is a good thing, in my humble opinion.
God can multiply those tiny seeds that "fall by the wayside"
when times get hard.
~~~~~~~~~~~~~~~~~
I have been young, and now am old;
yet have I not seen the righteous forsaken,
nor his seed begging bread.
Psalm 37: 25 KJV
~~~~~~~~~
I once was young and now I'm old,
but I have never seen the Lord abandon a righteous man
so that his children had to beg for food.
Psalm 37:25 The Clear Word Paraphrase
~~~~~~~~~~~~~~~~~~

We have a work to do--not of our own strength--but in His.
We must choose to cooperate with Him.
Gardening is a perfect example of this.
We must till, plant, weed, harvest, preserve.
God provides the seeds, the sunshine and rain, the miracle of life
harnessed inside those tiny portable packages called seeds...
he provides the fruits for us to harvest and eat,
which gives us the strength to continue our labors
and to preserve the excess bounty for the leaner times...
and the seeds to save for the next years cycle.
We work together, in the yoke with Him.

And sometimes, because he is merciful,
He grants us abundant, undeserved blessings--
in the form of volunteer harvests!
Isn't God good?

God loves us...He sustains us...and He Provides!

How have you experienced His Provision recently?
I'd love to know.

Have a wonderful day!

10 October 2010

Oven Canning


We are home for a few days,
waiting for repairs to 'Ole Blue's (our elderly pickup) transmission,
and The-Man has been making good use of the lull in activity.

We have a bunch of dry grain flakes,
nuts and seeds that we have stocked up on,
and we need to clean out the freezers for moving,
and...
we are planning to live off grid anyway,
so.....
we are experimenting with ways of preserving our food
that do not require long-term use of electricity.

I remembered my momma used to can cereal flakes and nuts
in jars in the oven, but I couldn't remember all the details.
Turns out, neither can she!
:D
So we decided to experiment and see if we could figure it out.

First I did an internet search for "oven canning"
and the discussion I found was quite interesting.
Seems like there are folks still using this method for all kinds of foods
although the USDA recommendations are against it.
I would encourage you to read the discussion
and come to your own personal conclusions--
take responsibility for yourself and your family.

Our opinion, at this point, is that
we will continue to use hot-water-bathing
and pressure-canning
for foods preserved in liquids
according to advice in our canning books.
More or less.
:D

Dry goods, though, are different.
We are not trying to destroy botulism organisms in liquid,
rather we are aiming to vacuum seal the dry goods
to avoid progressive rancidity or the formation of mold.
We do have a vacuum-sealing device,
but wanted something that we could be more confident would last a long time,
with as little expense incurred as possible.

I did not find any of the above mentioned discussion to
specifically address the canning of dry goods,
so, though entertaining, my research was not greatly helpful.

We tried several different approaches,
but here is what we found to give
consistent and satisfactory results:

First off, make sure your canning jars are sanitized and thoroughly dry.
Place cookie sheets on the very bottom rack of the oven
and remove any other racks.
Preheat your oven to 250 degrees F.
Fill your clean and dry jars with the dry goods and set aside.
Bring a small kettle of water to boil on the stove top
and in it place your seals, allowing them to soften in the boiling water
for 2 to 10 minutes.
Meanwhile, fill a large kettle with hot tap water,
either in your sink or on your stove top,
whichever is convenient to your work location.
When your oven is up to temp,
and working quickly (extra hands are helpful at this step)
do this for each jar of goods before placing it in the oven:
Dip each jar of goods into the kettle of hot water for a few seconds,
but don't submerge it--
only have the water come up about 3/4ths of the way to its top-- 
you don't want to get water inside your jar!--
pull it out of the water and then
wet your finger with warm water
and run it around the top of the canning jar,
then quickly place the wet hot seal on it and
screw down well with the band.
(You want to create a good seal this way.)
Next put the jar back in the kettle of hot tap water
and let it sit there while you dip and seal the next jar.
When the next jar is lidded and ready to sit in the water "bath"
pop the first one into the oven onto the cookie sheet.
Pre-heating the jars this way prevents them from cracking
due to sudden temperature change when you place them in the hot oven.
Leave some space between the jars--
you don't want them to touch each other.
When all the jars are in the oven,
close the door and set the timer for two hours.
Walk away and leave it alone.

When the two hours are done, turn the oven off.
Do NOT open the door!
Just leave it alone and let the whole thing cool
over night or around 12 hours.

After several hours you should begin to hear
a "tinking" noise coming from the oven occasionally--
as the jars cool, the vacuum creation process begins,
and the tinking sound is the safety seal being pulled down in the seal/lid.
(This is beautiful music to your ears--trust me!!)

When completely cooled, remove jars from the oven.
Test each seal to see if it is sealed.
(It should be solid when you press it,
not have any flex or go up and down.)
Any that did not seal should either be reprocessed
or used soon.

There can be many reasons for the lids not to seal,
including--but not limited to--
a nick in the top of the jar that prevents a seal forming,
not enough moisture to create a good seal,
rubber on seals not soft enough, preventing good seal,
a defective lid.....etc.
Don't be discouraged, this doesn't happen very often.
Keep trying and learning!

We prefer to eat raw nuts,
as the nutrients are more readily absorbed by the body,
and I was concerned that this method might really toast the nuts.
We found that a few nuts on the bottom of each jar get a little browned,
but amazingly the rest taste pretty much raw!
Same thing with cereal flakes and grains.

On our most recent "moving" trip to the farm,
The-Man was digging around in the basement
of daddy's house for more canning jars that my momma had stored there.
and was also clearing off some shelves to make room
for us to store our canned goods temporarily
until we can get a place built of our own,
when he came across some jars of nuts my momma had canned years ago.

Now, my momma has been in a nursing home for almost 6 years,
so we know those nuts had been oven-canned for at least that long,
and I'm guessing probably even longer.
We brought several jars home to try
and were very excited to discover that the ones in which the seals were still good
tasted as fine as could be!
There were walnuts, almonds and pecans.
A couple of jars had rusted through the lid,
(their basement is very damp, often has running water...)
losing the vacuum seal, and in one of those the nuts were rancid.
The other had just a tiny hole,
and 99% of the nuts were good, we only found a couple that were bad!
I had planned to take pictures of them--
but we ate them up and I think I already threw the rusty lids away!
Oh well, if we find more on our next trip, I'll grab a picture then.

Also, my momma did remember that she found the directions to
oven-can dry goods this way in an old farm cook book...
I will try to find that when I'm out there again,
and will reprint the directions in another post.

I am anxious to try preserving brown rice this way.
It takes up so much freezer space,
but goes rancid very quickly if not kept frozen.
I'll post an update when we do that...

So there you have it,
the very latest in "experimental research!"
We are very satisfied with our results, so far!

06 October 2010

Simple Apple Butter


We were blessed (again!) by Neighbor and Mrs. M's generosity...
yesterday we came home with about two bushels of delicious tart apples
from their home orchard.

Apple season is almost over here...the apples will all be gone
by the end of next week, according to Neighbor M,
so we were delighted to be able to obtain a few more.

Now, our family loves tart apples with a little sweetness...
Neighbor and Mrs. M much prefer sweet apples.
It all works out...we do our part to take the tart ones "off their hands."
:D

Here is what we are doing with part of the apples today:

Simple Apple Butter

12 cups apples, peeled and cored

Place apples in crock pot and cook all night on LOW with the lid on.
Do NOT add any water--the apples will make enough liquid
as they cook to keep them from sticking or burning.

In the morning, add the following:

2 cups sugar
1 tsp. cinnamon
1 tsp. allspice
1 tsp. nutmeg

Leave the crockpot lid OFF and turn it on HIGH
and cook the mixture for 3 to 4 more hours
until it reaches a thick consistency--
however you like it.

Place in refrigerator or preserve however you wish.

We tried this recipe a couple of weeks ago and we loved it,
although I must admit we altered it quite a bit.
We used coriander and cardomom as spices,
stevia powder and a little honey for sweetening,
and The-Man added some pear pulp that he couldn't bear to throw away...
the pear pulp made it a little gritty, but it was still good
and we will enjoy it on our toast on cold winter mornings!

I do advise always following a recipe according to directions the first time...
from there you can experiment...but this recipe was really forgiving and delicious
and I think you will enjoy it.

By the way, the recipe came to us from Neighbor and Mrs. M...
they got it from another neighbor, who got it from their daughter...
and we don't know where she got it from...
so I don't know the original (but brilliant) source...
otherwise I'd be mighty happy to give credit where credit is due.

I'll edit this post tomorrow and add a photo of the finished product...

Enjoy!


Here's what the apple butter should look like
after adding spices and sweetner the next morning.


We have two crockpots, we pick them up for  $3-$4 at thrift sales,
and so we made two batches, yield was 3 pints per crockpot.

30 September 2010

Old-Fashioned Apple Cider


Several days ago while out for my early morning walk
I encountered Neighbor and Mrs. M
(who were also out exercising.)

Neighbor M has a small home apple orchard 
with which he kindly blesses the neighborhood 
and his ever-widening circle of friends.

On this crisp and beautiful morning
he inquired if our family would be interested 
in picking some apples to put up for our winter larder.

Now who could turn down an offer like that?!

I assured him we would love to come a bit later in the day
and pick some apples, 
and then I boldly asked if he had his antique cider press ready for action yet,
as I wanted the Treasure to experience that process
one more time before we leave the neighborhood for good.
He assured me that it was up and ready
and to come on over and we would make some apple cider. 
Mid morning we headed that way.


So here's how we made apple cider on that beautiful day in September.


First, you get the tools out,
then you shake the trees
and pick up the apples.


Note the tools used for gathering the apples.
They are actually marketed for gathering nuts,
but they work dandily for apples, too!
You just roll the wire cage over the fruit
and the apples pop themselves into the contraption.
Then you take the gathered goods to the collection container,
open the flexible wires and let them drop out.
Easy-Peasy.
And it saves a lot of backaches!


This is the tool that Neighbor M uses to shake the trees.
It is also used for pruning...but at present I can't tell you which hook is which,
as I'm not that familiar with the tool.
It is very handy, definately a must have for orcharding.


After gathering the apples
(we had about 5 crates)
you plunk them in big containers of water
and splash them up and down to clean them well.

Next you sit in a friendly group around the buckets of wet apples
with knives and while you visit you cut out the worm holes and bad spots,
putting the yucky stuff in a separate bucket,
and the good apples and parts in another big container of water
and they are splashed and rinsed well again,
then placed in a crate by the apple cider press.
Many hands make light work!


Here the apples are,
spiffy clean and pared and waiting for the big squeeze.


When we first moved to the 'hood around 20 years ago,
Neighbor M had a hand crank on this press
and we all took turns making it go 'round.
A year or two ago, the internal mechanisms of the press were getting loose
and so Neighbor M had some repairs made to it
and now it is tight and difficult to turn,
so he attached a motor.

Efficient, but I miss the nostalgia of the hand crank.


The apples are placed in the hopper on top,
and there is a chopping mechanism
then two geared wheels that grind and crush the flesh.
The pulp drops into the slatted barrel beneath.


Here the hopper has been removed
and you can see the geared wheels that
grind/crush the fruit as they turn inward toward each other. 


When the slatted barrel is crammed full of juicy apple bits,
it is slid forward on the stainless tray
until it is beneath the pressing mechanism.
A wooden lid is placed on top
then a wheel is turned by hand to lower the iron screw
so it forces the wooden lid down on top of the apple pulp.


The mechanical pressing force
causes the juice to run out of the apple pulp,
through the slats of the barrel,
down the stainless tray
and into the waiting bowl below.

The cotton fabric lining the bowl is used as a strainer,
as invariably there is some debris that flows in with the juice.

There are many insects that come to investigate the process,
and some of them are so greedy
they drown themselves in the golden goodness!
Since most of them come with stingers on one end,
having a cloth for a filter is a good thing.


Finally, the juice is carefully poured into clean containers.
The black wooden contraption at the top of the photo
is one of two jigs that Neighbor M created
to help hold the variety of plastic bottles used to store the juice
so they don't get knocked over while being filled.


Here's the apple pulp that is left after pressing.
It makes great compost, or,
great food for wildlife or livestock.
Neighbor M has a friend that likes to feed it to his cows.
They think it is candy!


And there you have it,
freshly made old-fashioned apple cider.

This pressing yielded 4-5 gallons of cider out of about 5 crates of apples.

We are bountifully blessed...
...we had the fun of making it... 
...the joy of fellowship and a sense of community,
and we will enjoy its goodness for weeks to come.
And we will cherish the memories for many years.


A delicious way to satisfy our thirst!

Many thanks to Neighbor and Mrs. M.
XOXOXOX!!!

27 September 2010

Persimmon Leaf Lattea


The-Man-of-the-Place has been spoiling me in the mornings recently.
He makes this soymilk-splashed-tea that we both love
with a bit of stevia for sweetening...
...sooo yum especially now that the mornings have a chill to them.


A neighborhood persimmon tree.
I learned about foraging this tea several years ago
while reading Stalking the Wild Asparagus by Euell Gibbon:
A recent discovery points to a use of the persimmon which is not concerned with the fruit. It has been reported in the scientific journals that "persimmon leaves have been found to give exceptionally high values in content of vitamin C." Persimmon Tea could help fortify your family with this protective vitamin, substituting at least in part for the expensive citrus fruits. This tea proves to have a very pleasant flavor, which is surprising in something so healthful. Tea made from the green leaves is very acceptable but that from the dried leaves is even better, having a flavor slightly reminiscent of sassafras.

(We do not find the tea made from the persimmon trees in our area to taste at all like sassafras. This, too, might vary from one locale to another.)

Persimmon tree leaves with green fruit
which ripens in late autumn to a peachy-orange color.
Gather the leaves in summer when they are full grown and spread them on newspapers in a warm attic room until they seem thoroughly dry. Pack them in fruit jars and heat the jar in a very low oven for 30 minutes. This preheating protects them from mold and if two piece dome lids are placed on the jars while they are still hot, cooling will cause them to vacuum seal and they will keep perfectly fresh through the year.

From chapter entitled "The Sugar-Plum Tree," page 169


The first time I dried these leaves I plucked them each off the branch
and put them in a thrifted food dehydrator.
It took less than an hour to dry them to a crisp.

The next batch, the-Man just broke off small branches with leaves intact
and placed them on a screen in our lean-to
to dry in the summer heat out of bright sunlight.
He left them about a week,
then brought them in and just crumbled the leaves into the storage jar.
Much simpler, much less work!

I do believe that I will try the oven canning method
Mr. Gibbons describes above when we move and are settled,
as we will not be living in such a temperature controlled environment
and the humidity could very well cause mold to form
which would make us very sad!


A couple of gallons of the crumbled dried leaves will get us through a winter.
Due to moving, we only have about a half gallon dried for the upcoming season...
so it is a weekend treat instead of an everyday one!

Unfortunately, there are no persimmon trees in the locale to which we are moving.
I believe that we will be planting some--
we love this beverage that much!


It makes a delicious plain tea, which is how we first tried it.
Adding the soymilk has been a recent experiment,
and I'm hooked.

I realize it's not coffee...
but it is better for me...

I'm very satisfied with my new "lattea."