Showing posts with label Frugality. Show all posts

27 January 2011

The Week in Blessings: Thursday~Thrift Scores


Thursday became errand day this week,
and after dropping off my collection of boxes at the donation stop
I ran into a thrift shop close by...
fortunately for me it was
"buy a bag for $1 and take home everything you can possibly stuff into it--
or pile on top!"
(said with a smile by a sweet nun)

There are two skirts
(navy +  khaki)
and 4 tops
(brown, red, green + gray)
all of which are replacing the wardrobe
that is lost in the move somewhere in another state.

The two sweaters will be repurposed,
the brownish-grayish one is being frogged
(more on that later)
and the baby blue cashmere will be felted.

I am blessed indeed.

07 December 2010

Bliss Amidst the Boxes


About a month ago, on a trip to check on my folks,
we stopped at a Goodwill store that was just off our beaten path
because the Man wanted to see if he could find a some jeans and chambray shirts.
He scored well~ 3 pairs of jeans and 2 shirts for less than $20.

While he was shopping I made a sweep around the rest of the store
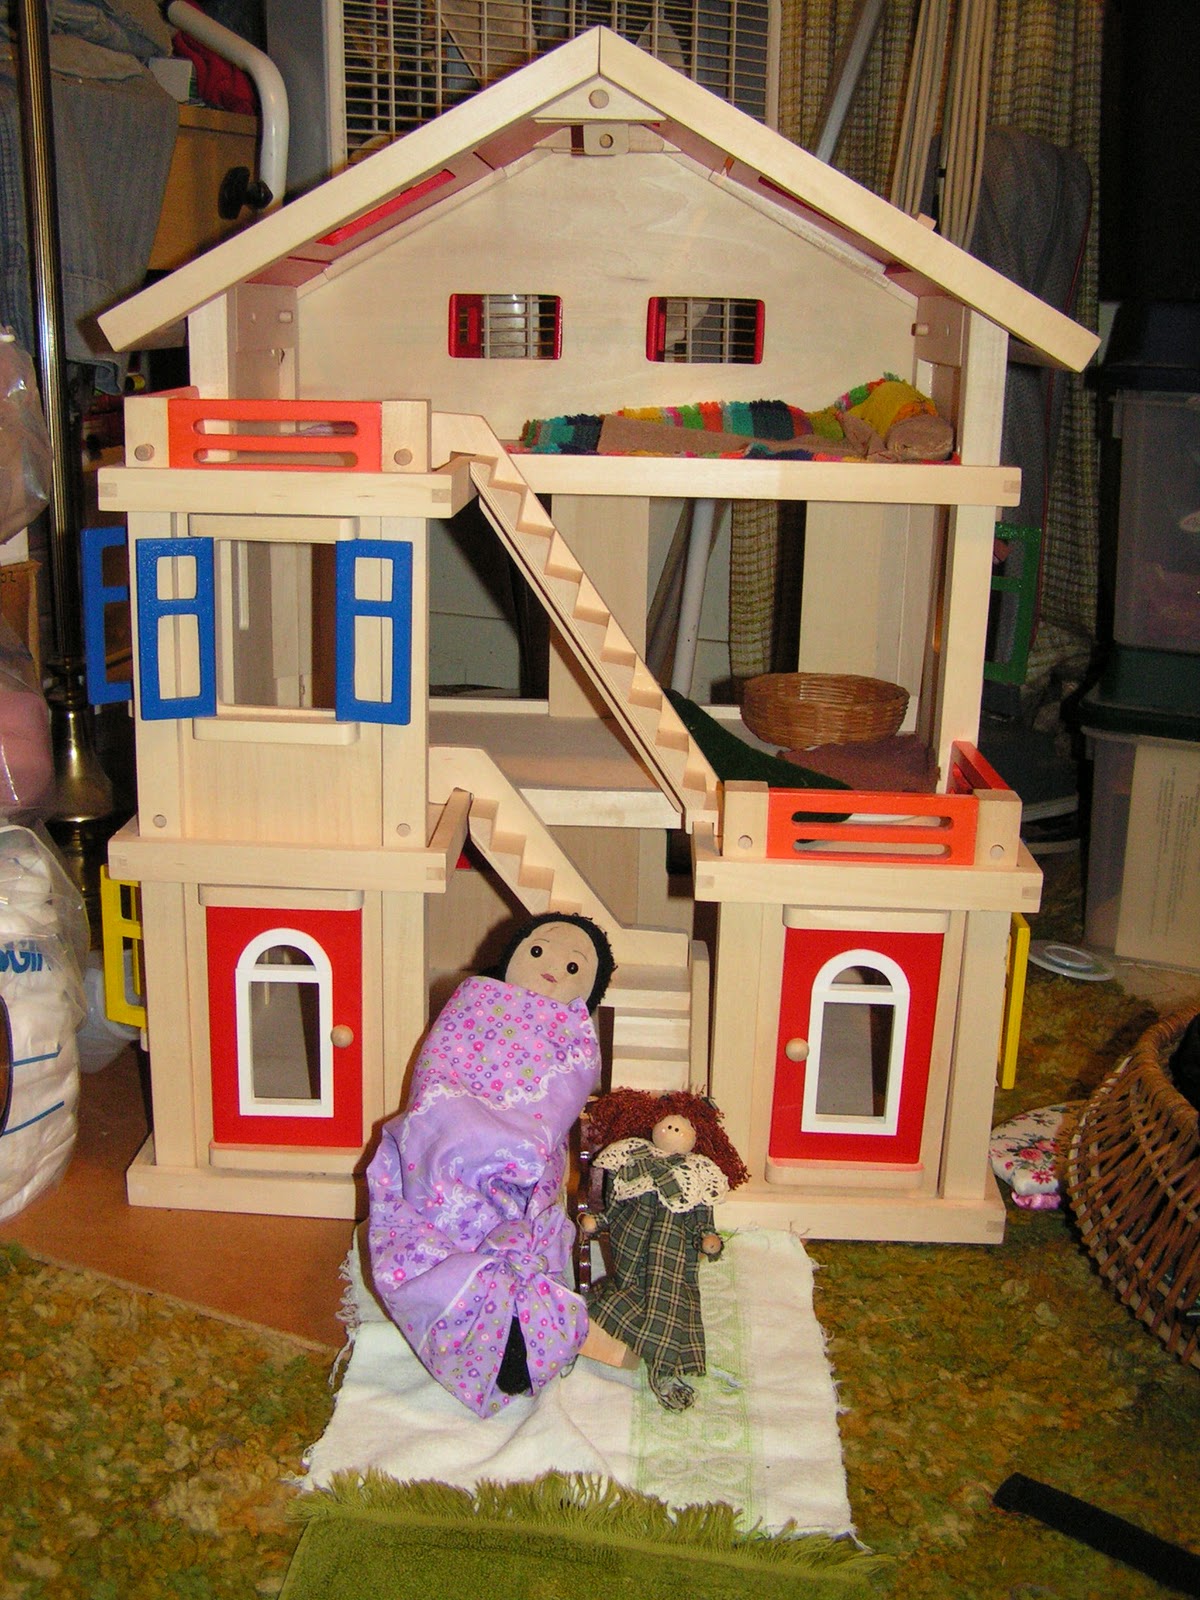
and saw this most adorable doll house...
I really loved it but didn't think the Man would go for it...
but, when he found it, all on his own, he was intrigued.
And when the Treasure added her very vocal adoration for its charm...
for another $19.95 it went home with us.
Home, in this case, meaning it lives at Poppa J's house.
(We are not going to move it twice!)

It was/is intended to be an early 'holiday' gift,
and the Treasure is delighted!
Turns out to be something she looks forward to on on trips,
and, it has really sparked her creativity as well.


The striped bedding is a thrifted napkin.
The pillows and blanket were designed and hand-sewn by the Treasure.


The doll's name is Anne, (like Anne of Green Gables)
and she belonged to my momma.
The rocker is hand~carved and was thrifted.
The purple and white rug is a piece of finger knitting by the treasure
that she requested I make into a rug...
I coiled it on a piece of paper and zig-zagged it to itself using a sewing machine,
starting in the middle and going around to the end.
(The paper was too stiff, so I soaked it in water
and dissolved as much of it as I could--
it works ok, but next time I'll use lite weight interfacing.)


A picnic supper set out for the dolls...
the dishes are vintage, I played with them when I was her age...
and the bowl of 'food' is just plain interesting...


The rag doll is named 'Charlotte' (like Laura Ingall's doll)
she is the momma...


Another thrifted chair...


...and if you look closely, there are several plain wooden 'babies'
(thrifted, of course!) nestled in-between Charlotte and Anne.

I'm enjoying watching my Treasure
find her own bliss amidst all the packing boxes...

10 October 2010

Oven Canning


We are home for a few days,
waiting for repairs to 'Ole Blue's (our elderly pickup) transmission,
and The-Man has been making good use of the lull in activity.

We have a bunch of dry grain flakes,
nuts and seeds that we have stocked up on,
and we need to clean out the freezers for moving,
and...
we are planning to live off grid anyway,
so.....
we are experimenting with ways of preserving our food
that do not require long-term use of electricity.

I remembered my momma used to can cereal flakes and nuts
in jars in the oven, but I couldn't remember all the details.
Turns out, neither can she!
:D
So we decided to experiment and see if we could figure it out.

First I did an internet search for "oven canning"
and the discussion I found was quite interesting.
Seems like there are folks still using this method for all kinds of foods
although the USDA recommendations are against it.
I would encourage you to read the discussion
and come to your own personal conclusions--
take responsibility for yourself and your family.

Our opinion, at this point, is that
we will continue to use hot-water-bathing
and pressure-canning
for foods preserved in liquids
according to advice in our canning books.
More or less.
:D

Dry goods, though, are different.
We are not trying to destroy botulism organisms in liquid,
rather we are aiming to vacuum seal the dry goods
to avoid progressive rancidity or the formation of mold.
We do have a vacuum-sealing device,
but wanted something that we could be more confident would last a long time,
with as little expense incurred as possible.

I did not find any of the above mentioned discussion to
specifically address the canning of dry goods,
so, though entertaining, my research was not greatly helpful.

We tried several different approaches,
but here is what we found to give
consistent and satisfactory results:

First off, make sure your canning jars are sanitized and thoroughly dry.
Place cookie sheets on the very bottom rack of the oven
and remove any other racks.
Preheat your oven to 250 degrees F.
Fill your clean and dry jars with the dry goods and set aside.
Bring a small kettle of water to boil on the stove top
and in it place your seals, allowing them to soften in the boiling water
for 2 to 10 minutes.
Meanwhile, fill a large kettle with hot tap water,
either in your sink or on your stove top,
whichever is convenient to your work location.
When your oven is up to temp,
and working quickly (extra hands are helpful at this step)
do this for each jar of goods before placing it in the oven:
Dip each jar of goods into the kettle of hot water for a few seconds,
but don't submerge it--
only have the water come up about 3/4ths of the way to its top-- 
you don't want to get water inside your jar!--
pull it out of the water and then
wet your finger with warm water
and run it around the top of the canning jar,
then quickly place the wet hot seal on it and
screw down well with the band.
(You want to create a good seal this way.)
Next put the jar back in the kettle of hot tap water
and let it sit there while you dip and seal the next jar.
When the next jar is lidded and ready to sit in the water "bath"
pop the first one into the oven onto the cookie sheet.
Pre-heating the jars this way prevents them from cracking
due to sudden temperature change when you place them in the hot oven.
Leave some space between the jars--
you don't want them to touch each other.
When all the jars are in the oven,
close the door and set the timer for two hours.
Walk away and leave it alone.

When the two hours are done, turn the oven off.
Do NOT open the door!
Just leave it alone and let the whole thing cool
over night or around 12 hours.

After several hours you should begin to hear
a "tinking" noise coming from the oven occasionally--
as the jars cool, the vacuum creation process begins,
and the tinking sound is the safety seal being pulled down in the seal/lid.
(This is beautiful music to your ears--trust me!!)

When completely cooled, remove jars from the oven.
Test each seal to see if it is sealed.
(It should be solid when you press it,
not have any flex or go up and down.)
Any that did not seal should either be reprocessed
or used soon.

There can be many reasons for the lids not to seal,
including--but not limited to--
a nick in the top of the jar that prevents a seal forming,
not enough moisture to create a good seal,
rubber on seals not soft enough, preventing good seal,
a defective lid.....etc.
Don't be discouraged, this doesn't happen very often.
Keep trying and learning!

We prefer to eat raw nuts,
as the nutrients are more readily absorbed by the body,
and I was concerned that this method might really toast the nuts.
We found that a few nuts on the bottom of each jar get a little browned,
but amazingly the rest taste pretty much raw!
Same thing with cereal flakes and grains.

On our most recent "moving" trip to the farm,
The-Man was digging around in the basement
of daddy's house for more canning jars that my momma had stored there.
and was also clearing off some shelves to make room
for us to store our canned goods temporarily
until we can get a place built of our own,
when he came across some jars of nuts my momma had canned years ago.

Now, my momma has been in a nursing home for almost 6 years,
so we know those nuts had been oven-canned for at least that long,
and I'm guessing probably even longer.
We brought several jars home to try
and were very excited to discover that the ones in which the seals were still good
tasted as fine as could be!
There were walnuts, almonds and pecans.
A couple of jars had rusted through the lid,
(their basement is very damp, often has running water...)
losing the vacuum seal, and in one of those the nuts were rancid.
The other had just a tiny hole,
and 99% of the nuts were good, we only found a couple that were bad!
I had planned to take pictures of them--
but we ate them up and I think I already threw the rusty lids away!
Oh well, if we find more on our next trip, I'll grab a picture then.

Also, my momma did remember that she found the directions to
oven-can dry goods this way in an old farm cook book...
I will try to find that when I'm out there again,
and will reprint the directions in another post.

I am anxious to try preserving brown rice this way.
It takes up so much freezer space,
but goes rancid very quickly if not kept frozen.
I'll post an update when we do that...

So there you have it,
the very latest in "experimental research!"
We are very satisfied with our results, so far!

18 August 2010

Is Toilet Paper a Necessity?


Do you have a weekly grocery budget that includes toilet paper,
facial tisssue and paper towels?
Are you as tired as I am of the rising cost of paper products
eroding what is left of your budget for actual food?

Does it annoy you that toilet paper, that almighty "necessity"
is actually something that you use once for hygenic properties
and then flush.....never (hopefully) to be seen again?

Does that seem a lot like just flushing
your hard-earned and not-so-plentiful-dollars down the toilet?

I thought so, too!
So, several years ago I began searching for viable alternatives.

In my lifetime, I have never used anything but toilet paper,
save the rare situation when I was caught unprepared in the wilds
and had to use whatever I could find.
:)


Two alternatives that quickly came to mind
included things I'd heard about since I was a kid.
Folks always joked about using corn cobs for 'doing business'...
and I remember my parents telling stories from their childhood
of always having an old Sears & Roebuck catalog handy in the outhouse.
Mom said they always used the black and white pages first,
as they were softer when crumpled,
and she always dreaded when they were gone
and they had to use up the crisper color-printed pages.

Corn cobs just don't appeal to me,
and we don't get a Sears & Roebuck catalog any more.
(even if we did, I trust my mom's judgement...
I don't even consider those crispy,
all color pages to be any kind of an alternative!)

But I did consider using the pages from an old phonebook.
Then I remembered that we are still using a flush toilet
and have a septic system, and somehow I don't think
stuffing yellow-pages down there would work very well
or keep me in the-Man-of-the-Place's good graces.

So I went on-line to see if I could find any other creative alternatives.
I finally came across an article (which I can no longer find or I would give a link)
that made mention of a very simple alternative.
I quickly emailed the author requesting more information.
He was a physician who was born and raised in another country and culture,
and he kindly answered my many questions.


Basically, millions of people in many parts of the world do not have the access
to paper hygiene products that we do here,
and even if they did they could not afford them.
But they have a basic, simple way to take care of 'business'.
Whether the toilet is a squat style or western bowl type,
you can easily clean up with simple soap and water.

After 'toileting', have a container handy that has
some sort of place on it with which you can fairly accurately aim a stream,
(such as a small pitcher, or a freezer container with square corners)
as well as a source of water, either a sink, spigot or bucket of water.
Fill the container with clean water and have it handy.
Wet your hand (the non-dominant one for those who are squeamish
or have questionable handwashing practices)
with water and then get some soap on it,
and use that hand to clean where the sun don't shine.
With your dominant hand, pick up the water container and aim the stream
at the part(s) you just cleaned, and rinse them and your soapy hand very well.
Grab the washcloth or small towel you have handy
and dry things off.

Next is an important tip for continuing good health:
Wash both your hands very well with soap and water!

Now, don't you feel all fresh and clean?
Once you try this enough to become proficient at it,
you will be amazed that you spent your entire life using yucky toilet paper.
Toilet paper just doesn't get you clean the way soap and water does.

And just think how much money you'll save!


All the gear you'll need for your new hygiene habits fit nicely on a small shelf
or in a little drawer. Just make sure they are conveniently located.

And don't be afraid to experiment.
The equipment above belongs to me.
The-Man-of-the-Place had his own preferences.


He likes to use a plastic water bottle with a special fitting he put in it
called a "nutted ninety." He ran across it in his previous line of work
and isn't sure if it could be purchased in a hardware store or not.

Expirement. Find what works for you.
And loosen up, laugh at yourself a little.
We're all in this together!


If you decide to give up the toilet paper habit,
and extra perk is needing less shelf space for all those disposables.


I love the extra "white space" in my cupboards,
and I love making my grocery budget stretch further.

We find it very satisfying to know that we don't need
to rush to the store in a panic next time it is announced
in the media that there is a shortage of TP in the local stores.
By keeping a year's supply of bar soap in the pantry,
We have the calm security of knowing we have what we need already at home,
and we know how to use it!

Downsizing doesn't need to be painful.
In fact, it can be really fun!